Image Generator: How to Use Inpaint to Customize Your AI Images
The Inpaint tool at MyBabes.ai Image Generator is your ultimate secret weapon for achieving complete creative control over your generations. Have you ever generated an image where the Babe’s pose, lighting, and face are absolutely flawless, but you wish she was wearing a red lace bra instead of a teacher outfit? Or maybe you want to fix an awkward AI artifact, adjust her body proportions, or smoothly transition her into a completely nude look?

Example of final inpaint result.
As detailed in our comprehensive Image Generator guide, the Inpaint feature is an advanced, experimental (beta) editing tool built directly into the MyBabes.ai ecosystem. It allows you to brush over a specific area of an existing image, describe exactly what you want to appear there, and let the AI repaint that exact zone from scratch while leaving the rest of the image completely untouched.
The Golden Rule: App Images Only
Before diving into the workflow, there is one critical technical rule you must know: You cannot upload images from your local device’s hard drive or phone gallery into the Inpaint tool.
The Inpaint tool exclusively processes images that already exist within the MyBabes.ai ecosystem. You can edit:
Images you have just generated yourself in the Babe or
Images you have previously saved in your gallery.
Images created by other community users that you have imported using the Remix action.
The Remix Synergy: When browsing the platform or another user’s creations, you can hit the Remix button to instantly port that exact prompt, model, and character settings into your generator. From there, you can push the image directly into the Inpaint tab without ever needing to download and re-upload a single file!
The Inpaint Interface & Core Settings
When you open the Inpaint tab, you will be presented with a straightforward but powerful workspace. Understanding these settings is the difference between an awkward edit and a flawless masterpiece.
Inside the Inpaint Workspace
To get the most out of your edits, it helps to understand how the interface is structured. Here is a quick breakdown of your control panel:
Tool / Setting
What It Does
Best Used For…
🖌️ Brush / Lasso
Defines the exact boundaries of your change. Everything inside gets remade; everything outside stays locked.
Brush: Small details (eyes, straps).Lasso: Large areas (outfits, backgrounds).
🔄 Edit Mode
Dictates how the AI treats the pixels hidden beneath your mask.
Keep Original: Subtle tweaks (hair color, expressions).Replace Completely: Total overhauls (clothing removal).
🤖 Model Selector
Swaps the underlying AI engine to shift the overall rendering style.
Artea: Immersive roleplay, high realism, and artsy, detailed skin textures.
✍️ Positive Prompt
The tag-based instructions telling the AI what to build in the empty mask space.
Comma-separated descriptive tags (e.g., naked breasts, wet skin). Absolute zero negative words allowed.
1. Masking Tools (Brush vs. Lasso)
Brush Tool: A freehand brush that lets you paint directly over the pixels you want to change. Great for irregular shapes, adjusting clothing straps, or tracing facial features.
Lasso Tool: A tool that lets you draw a closed boundary line around an object to select it completely. Perfect for quickly isolating larger areas like backgrounds, whole outfits, or full limbs.
2. Edit Mode (The Most Critical Choice)
Your choice here dictates how the AI behaves inside your mask:
Replace Completely (Recommended for big transformations): This completely erases the masked area, turning it into a blank canvas. The AI ignores what was there before and generates a brand-new element based entirely on your new prompt. Use this for: Removing clothes, changing outfits entirely, or introducing completely new objects.
Keep Original: This tells the AI to look closely at what is currently inside the masked area and gently blend your new prompt into the existing content. Use this for: Changing hair color, altering facial expressions, or making subtle adjustments to an existing outfit.
3. Model Selection
Just like in the standard generator, you can choose which AI engine powers your edit. If you are looking for a highly immersive, detailed, and artsy adult roleplay aesthetic, selecting the Artea model yields excellent, high-fidelity results.
IMPORTANT: Always select the model for editing that matches the one the image was created in. For example, if you are editing an image created with TrueLook, you must select TrueLook for editing.
4. Credit Cost & Image Count
Inpainting is highly economical. It costs exactly one token per image generated, matching the standard cost of the Babe and Scene tabs. You can choose to generate anywhere from 1 to 5 images simultaneously (3 is highly recommended). Because Inpainting is an experimental beta tool, generating multiple variations at once gives you a wider pool of options to choose the most seamless blend.
Master the Language: Positive-Only Prompting
The AI powering the Inpaint feature operates on strict positive description mechanics. It has zero ability to understand negative commands, subtraction words, or deletion concepts. If you type words like ”remove”, ”no”, ”without”, or ”delete”, the AI completely ignores them or gets deeply confused.
Instead, you must look at the mask as an empty space and describe only what you want to appear in that space.
Wrong Approach ❌
Correct Inpaint Approach
Mask the bra -> Prompt: ”remove the bra”
Mask the bra -> Prompt: ”naked breasts, bare skin, heavy cleavage”
Mask the panties -> Prompt: ”no panties”
Mask the panties -> Prompt: ”shaved pussy, naked hips, bare skin”
Mask the glasses -> Prompt: ”without glasses”
Mask the glasses -> Prompt: ”detailed green eyes, beautiful face, soft makeup”
Step-by-Step Practical Guides for Popular Edits
Scenario A: Making a Babe’s Breasts Smaller or Larger
Modifying body proportions requires understanding how the AI views anatomy. If you only mask the breasts themselves, the AI will generate the new size, but the surrounding skin, ribcage, and stomach lines will not align properly, resulting in a distorted look.
Step 1: Select your image and open the Inpaint tab.
Step 2: Choose the Brush tool.
Step 3: Pro Masking Tip: Mask a significantly larger area than just the breasts. Paint over the breasts, a portion of the upper ribcage, the sides of the torso, and the top part of the belly.
Step 4: Set Edit Mode to Replace Completely.
Step 5: In the prompt box, write clear, descriptive, comma-separated tags detailing the new body shape (e.g., ”small pert breasts, athletic torso, smooth skin, slender waist” or ”huge natural breasts, deep cleavage, voluptuous figure”).
Step 6: Select your image count and hit generate. The extra masked space allows the AI to perfectly recalculate and blend the body’s natural proportions smoothly into her hips and shoulders.
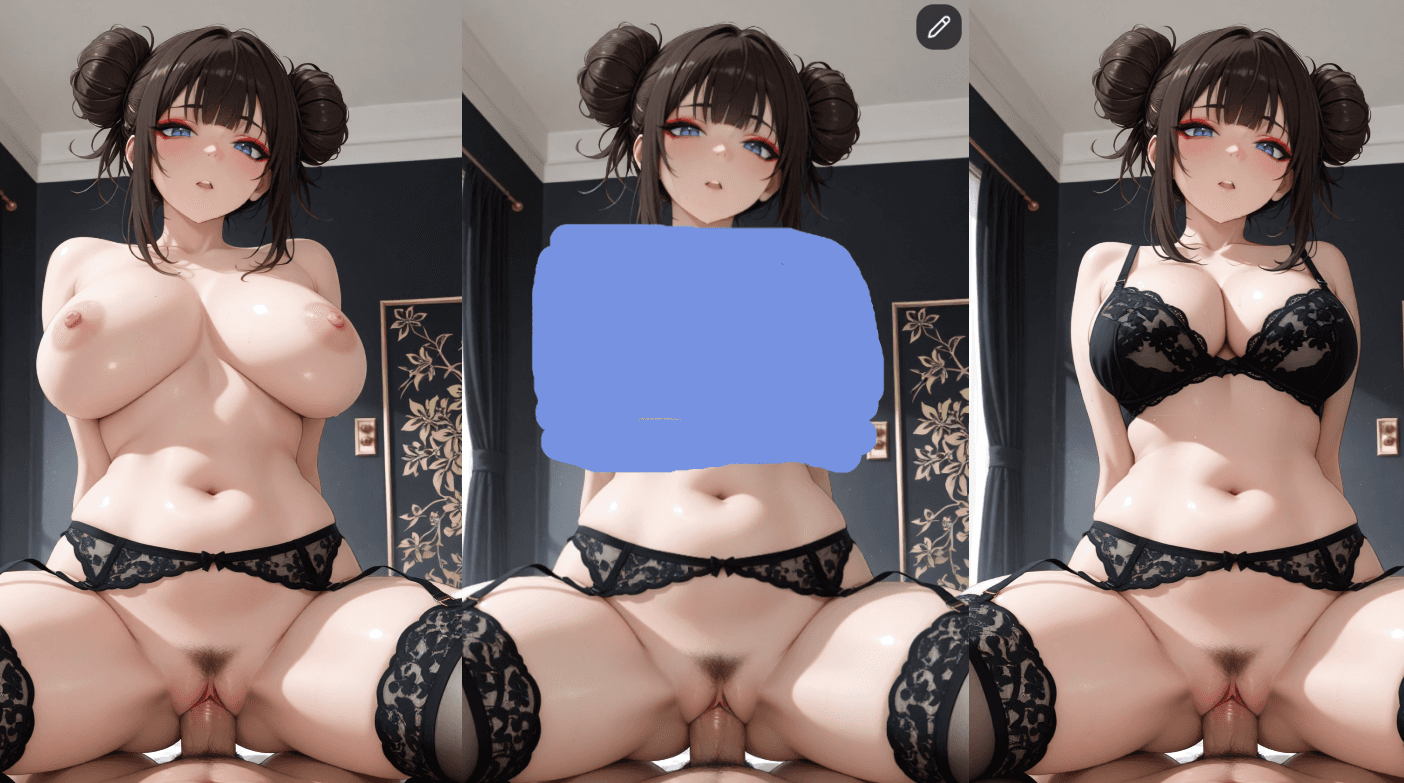
Example: Select an image → Cover the area you want to change and describe the changes → Final result.
Scenario B: Changing Hair Color
Shifting hair color is one of the easiest, cleanest edits you can perform because it relies on existing textures.
Step 1: Use the Brush tool to carefully paint over all visible hair. Do not worry if you catch a few millimeters of the background or the forehead; the AI blends it well.
Step 2: Set Edit Mode to Keep Original. This ensures the AI retains the exact flow, style, and length of the original hair rather than giving her a completely different haircut.
Step 3: Enter your positive tag (e.g., ”vibrant neon red hair, shiny locks” or ”glowing platinum blonde hair”).
Step 4: Generate 3 to 5 options to find the perfect shade and shine.

Example: Select an image → Cover the area, text “wet blonde hair” → Final result
Scenario C: Handling Tricky Facial Changes (Like Eyeglasses)
Structural facial edits are complex. Implementing eyeglasses or removing them entirely can easily alter the underlying geometry of your Babe’s face, sometimes making her look like a different person.
Step 1: Mask the eyes and the bridge of the nose where the glasses sit or will sit.
Step 2: If you are adding glasses, set Edit Mode to Replace Completely or Keep Original depending on how thick you want the frames to be. If you are removing glasses, choose Replace Completely to wipe the frames out.
Step 3: If adding glasses, prompt explicitly: ”wearing stylish round black rimmed glasses, eyes visible through lenses”. If removing glasses, prompt cleanly for the face: ”detailed blue eyes, long eyelashes, perfect face”.
Step 4: Generate and look closely at the facial structure to ensure your Babe’s signature look is preserved.

Example of multiple inpaints at once: Select an image → Cover multiple parts → Text “ripped pantyhose, naked chest, pierced nipples, choker → Final result
Pro Checklist for Flawless Inpainting
Before you hit that generate button and spend your token, run through this quick workflow checklist derived from our official interactive guides to guarantee the best results:
Is it one change at a time? Do not try to change her outfit, fix her hair, and add a background asset in a single mask. Multiple simultaneous edits often fail or produce chaotic, poor-quality results. Do them sequentially.
Is the mask large enough? Remember that masking a slightly larger area than the object itself helps the AI smoothly blend the new edges into the unmasked parts of the image.
Did you check for negative words? Scan your prompt text. Ensure words like ”remove”, ”no”, or ”clean” are completely absent.
Are you using tag-style language? The MyBabes.ai architecture thrives on descriptive, comma-separated tags rather than long conversational stories. Keep it concise, descriptive, and highly positive.